Refinishing the Kitchen Table

I stepped outside of my DIY comfort zone last weekend and stepped into the garage. Normally the garage is strictly Ryan’s domain, but I’ve meaning to refinish my kitchen table for years and I decided to finally take the leap and get ‘er done as it were.
I inherited the table after my grandparents passed away, and before them, it belonged to my great grandparents. Before anyone gets all “Antiques Roadshow” on me, I know that refinishing anything antique strips away value. Rest assured, that my grandmother had already refinished the table once, so it had no monetary value as antique, just sentimental value to me. This table was the center of every family gathering at my grandparents house. Almost every memory I have of my grandma involves her sitting at this table, doing crossword puzzles, drinking a beer (later O’Doules) and smoking cigarettes. It meant a lot to me that I got to keep this table. However, it wasn’t in the best of shape by the time it came to me. The finish was in bad shape, and completely warn where Grandma usually sat. The table also had a couple leaves that my grandma’s dinning room was too small to utilize. One had never been refinished, the other hadn’t been used since it was refinished, so neither matched the table anymore.

 The table legs and edge have intricate details that my grandma did not refinish. She had just stained and varnished the top. My wood finishing skills being way below hers, I wasn’t about to attempt to refinish the details either. I had Ryan remove the table top from the legs and remove the edging from the table, so I could just refinish the top. The tricky part would be finding stain that match the legs, since the original finish was in good shape, but had untold years of patina.

 Lucky for us, Menards sells stain samples for 30 cents a piece. 6 samples and 3 trips to Menards later, we had a close match. Golden Oak.

Now that we had supplies it was time to get started. First step was the strip off the old finish using a chemical stripper. I don’t have the patience to sand that much, and using stripper is fun. And burny. Where gloves folks, the kind made for stripping. This stuff will eat right through regular rubber gloves. I spilled some on our driveway and it burned a hole in the asphalt. I’m not kidding.
 Using the stripper is quite easy. Paint it on with a natural bristled brush, let it sit 10 minutes, scrape it off with a scraper. The finish basically peels off. I repeated the strip process 3 times to make sure I got off all the layers of old varnish. Most the color came off with it.


 Once stripped, I wiped it down with stripper wash. I just think it’s hilarious that a product called “stripper wash” exists, and it isn’t dirty… Anyway, the stripper wash stops the chemical reaction of the stripper so new stain will stick.
Now it was time to sand. I started with 80 grit sand paper, then did 120 and then 220. Ryan let me use his palm sander. I’m normally against power tools, but he assured me I couldn’t cut off fingers with this sander.

There were a couple of dings and gouges in the table that needed to be refilled. At Ryan’s suggestion, we used a combination of wood glue and sawdust from the sander to fill the holes. This way we knew it would match the wood and except the stain correctly.


Once the glue setup, I gave it another go over with 220 sandpaper.

To clean up the dust after sanding, I wiped the table down with Mineral Spirits. Then I used a wood conditioner to make sure the stain would go on smooth. Wood conditioner is more important on soft woods like pine, and I’m pretty sure the table is oak, but I figured it couldn’t hurt.

 Now it was time for stain. I put on 3 coats of Varathane Golden Oak. I used an old t-shirt as a rag to wipe on the stain. You wipe on the stain against the grain of the wood, then wipe it off with the grain.


After the last coat of stain dried for 24 hours, it was ready for polyurethane. I used Minwax Satin Clear Polyurethane. Apparently I neglected to take a picture of the can. Between coats of poly, I sanded lightly with 220 grit sandpaper and wiped it down with mineral spirits to remove the dust. Some of the wood absorbed more poly than others so the first couple coats looked uneven when they dried. In the end I did 4 coats of poly, but I got a nice smooth even finish. Which is good, because this table will get used and wiped down a lot. It needed a good protective coat.

 I let the last coat of poly dry for 48 hours. Longer than it needed, probably, but after 24 hours the edges of the table, where the poly ended up thicker, still felt sticky. When it was good and dry, Ryan put it back together. Liam helped.

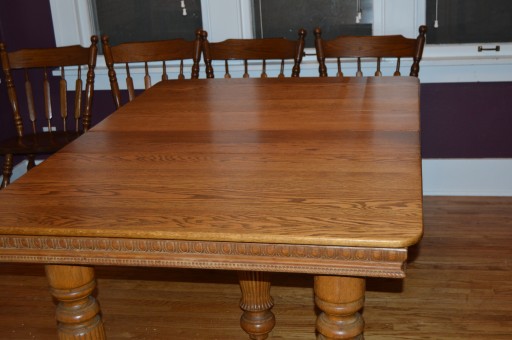
Here it is with the leaves. Now I can have a dinner party!

 I am impressed with how well the leaves match. The one that is slightly darker was the one that had never been refinished. It was significantly darker and more weathered than the other leaf. The other leaf had been refinished then set in a closet never to see light again and it was significantly brighter and shiner than the table. In the end, they are remarkable close. I am also really happy with how well the newly finished top matched the detail. They aren’t prefect, but I think they are as close as they can be. I don’t think anyone would notice if I didn’t tell them.
 In the end, I couldn’t be happier with how the table turned out. It isn’t perfect, there are a couple spots where the finish isn’t as smooth as it could be, and a bristle came out of the brush that I didn’t noticed and it got encased in the poly, but you’d have to look for it. There was a cigarette burn that I couldn’t sand all the way out, too. But if I wanted a perfect new table, I would buy one. This table is all about memories, and now with the new finish, I am confident it will be around for many more.

